This post describes my DIY wireless solar powered temperature and humidity sensor network, which I have installed in my apartment. Everybody can buy a cheap solar powered weather station, but I wanted to build it myself and learn a thing or two about electronics in the process.
Disclaimer
This is just a hobby of mine and I am not a professional electronics engineer. I am sure there are tons of things I could have done better. I would love to hear your suggestions in the comments section.
Board Design and Wiring
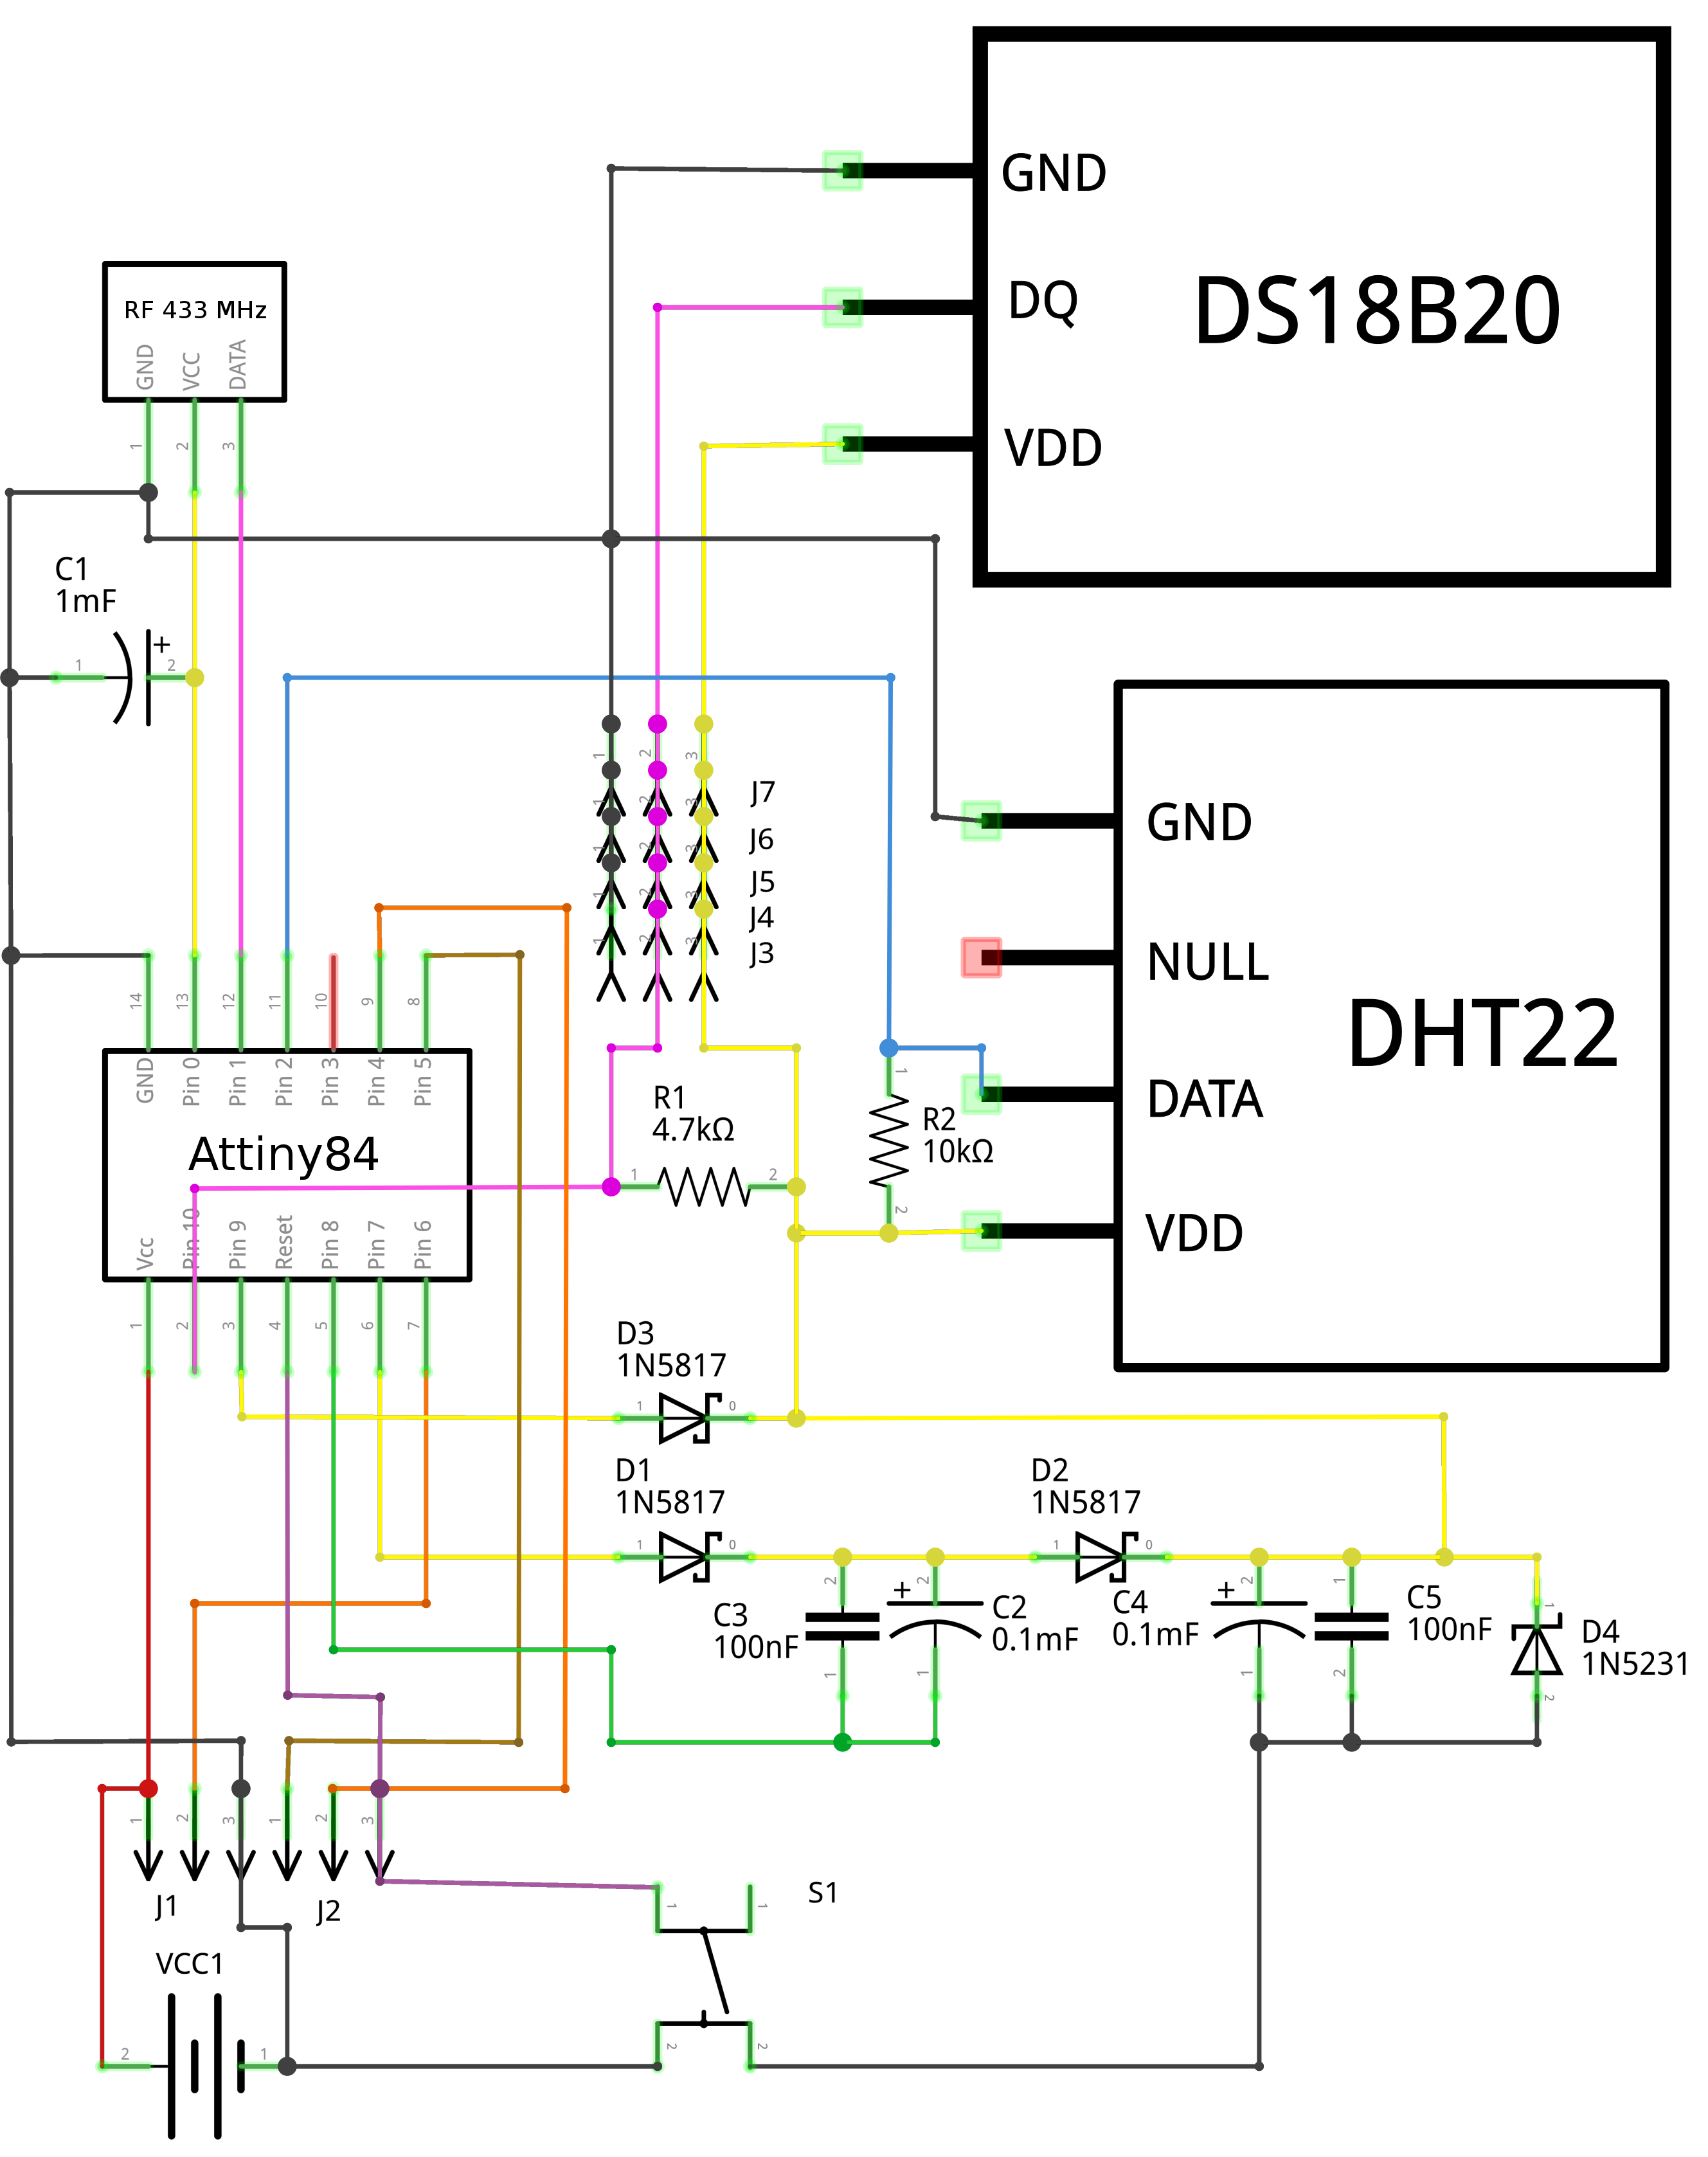
It is a very simplistic through-hole design based around an Attiny84. The headers J1 and J2 are compatible with a 6-pin ISP plug, so that the module can be programmed directly with an ISP programmer. All the other components like sensors and wireless communication modules are controlled and powered through the Attinys IO pins. This allows the Attiny to power off everything when it is in sleep mode and therefore reduce the overall power consumption. The huge disadvantage of this design is, that a IO pin can only source 20 mA.
Sensors
I used a DHT22 to measure humidity and temperature and a DS18B20 as a backup. I added the extra DS18B20 temperature sensor, because I had bought a bag of 10 of them on Amazon and had no particular use for them. The female headers J3-7 can be used to plug in 5 extra DS18B20 sensors to the same one-wire bus. The neat thing about the DS18B20 is, that it actually supports this configuration.
The single 4.7k pull-up resistor R1 is enough for all devices connected to the one-wire bus. R2 is the 10k pull-up resistor for the data line of the DHT22
433MHz Transmitter
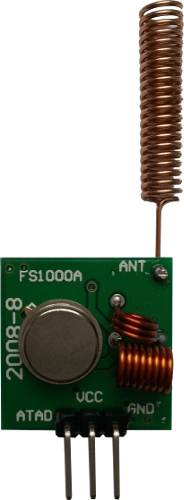
I used one of these cheap no-name 433 MHz transmitters. They usually don't come with these neat little antennas shown in the picture, but in my experience you absolutely need them to get any usable range. You can simply make your own antenna out of a piece of wire, but I think it's easier to just order the antenna from the same vendor you get the transmitter from and pay a few cents extra.
The 1000 µF capacitor C1 serves as an energy buffer for the transmitter. It is only necessary, because I chose to power the transmitter with the Attinys IO pin, which can only source 20 mA. Without the capacitor the voltage drops significantly during transmission, which reduces the range.
There are already a few Arduino libraries around for these cheap modules, but none of them was reliable enough for my purposes, so I wrote my own library. The source code is published on GitHub under the Gnu GPL and I wrote a blog post detailing its features.
Dickson Voltage Doubler
Every device needs a minimum voltage to operate correctly. This so called cutoff voltage is different for every device. For example the Attiny84, using the internal oscillator and running at 8 MHz, can work down to 1.8 volts. Unfortunately the other components, like the DTH22 humidity sensor and the DS18B20, need at least 3.3 volts. The voltage of a battery or super capacitor drops continuously while it is discharged, so when the cutoff voltage is reached there may be plenty of charge left, but the device will still stop working.
So to lower the cutoff voltage of the whole device and increase the runtime, I needed to find a way to step up the voltage before it drops below 3.3 volts. Since the Attiny84 can work down to 1.8 volts I used its PWM signal to construct a Dickson Voltage Doubler. The idea for this came from Dave Jones' EEVBlog #473. The video gives very detailed instructions on how to build it and explains some of the theoretical background on how it works.
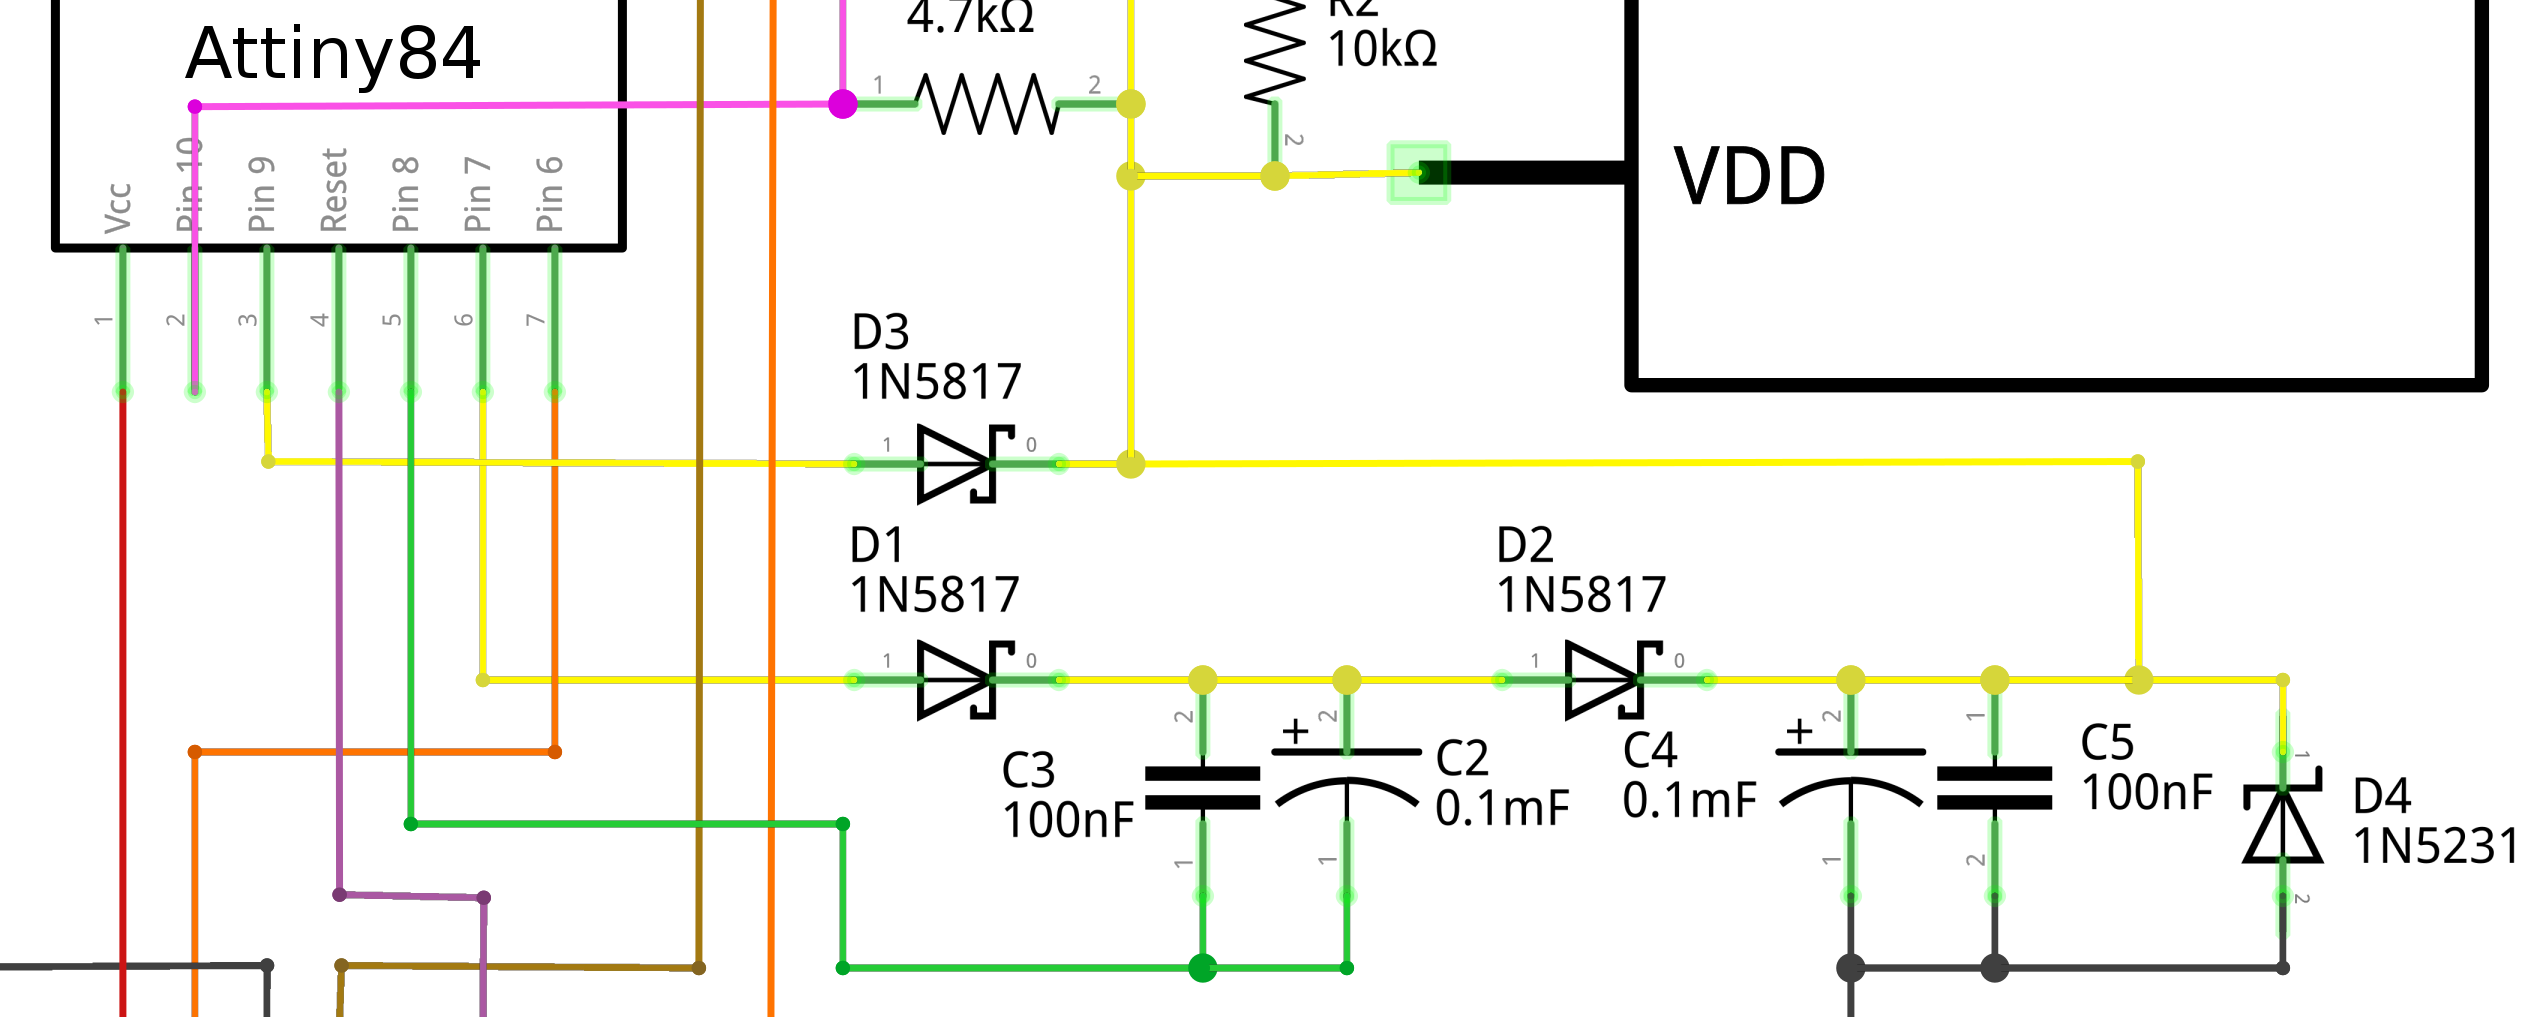
When the input voltage is high enough and there is no need to step up the voltage, the Attiny84 disables pin 7 and 8 and sets pin 9 to HIGH, so that the sensors get the input voltage minus the diode losses caused by D3. Conversely when the voltage drops below a certain threshold pin 9 is switched off and the voltage doubler is switched on.
To do that the Attiny84 generates a 500 Hz PWM signal on pin 8 and sets pin 7 to HIGH. I had to use 500 Hz, because changing the frequency would mean changing the configuration of Timer0, which would lead to all sorts of problems, because it is used by the Arduino environment for timing functions like delay(), millis() and micros(). I also couldn't use Timer1, because pin 5 and 6 are needed for the ISP connector. So to compensate for the low frequency I had to use higher value capacitors for C2 and C4. That's also the reason why I added C2 and C4 in the first place. With a higher frequency PWM signal, C3 and C5 would be enough.
#define DOUBLER_POWER_PIN   7
#define DOUBLER_PWM_PIN     8
#define DOUBLER_THRESHOLD 3400

static void doublerOn() {
  pinMode(DOUBLER_PWM_PIN, OUTPUT);
  analogWrite(DOUBLER_PWM_PIN, 127);

  pinMode(DOUBLER_POWER_PIN, OUTPUT);
  digitalWrite(DOUBLER_POWER_PIN, HIGH);
}

static void doublerOff() {
  pinMode(DOUBLER_PWM_PIN, INPUT);
  digitalWrite(DOUBLER_PWM_PIN, LOW);

  pinMode(DOUBLER_POWER_PIN, INPUT);
  digitalWrite(DOUBLER_POWER_PIN, LOW);
}

static void sensorsOff() {
  pinMode(9, INPUT);
  digitalWrite(9, LOW);
  doublerOff();
}

static void sensorsOn(bool useDoubler = false) {
  if (!useDoubler) {
    doublerOff();

    pinMode(9, OUTPUT);
    digitalWrite(9, HIGH);
  } else {
    pinMode(9, INPUT);
    digitalWrite(9, LOW);

    doublerOn();
  }

  dht.begin();
  dallas.begin();
}
I must admit, that I don't fully understand how the next step works. Basically D1, C2, C3 and D2 shift the PWM signal to a higher voltage and C4 and C5 smooth out the signal to clean DC. I added the zener diode D4 to clamp the voltage to a safe level. The diode D3 is probably not necessary. It is there to prevent current from flowing backwards through pin 9, but that can only happen if the Attiny84 sets the pin mode to OUTPUT and the pin to LOW, which basically connects it to ground. So D3 is there to fix a software bug in an old firmware version I used for testing. I have since fixed the bug, but it is too much effort to desolder the diode.
With the voltage doubler the whole sensor module will work down to 2.1 volts. Below that threshold it will go into deep sleep and wait until the voltage increases again. If the voltage drops below 1.8 volts though the Attiny84 will crash and never recover on its own.
Perfboard Wiring
I soldered the components onto a 6x4cm perfboard, which when put in a small box is a neat little self-contained wireless sensor module. I did most of the wiring on the back, using pre-tinned 0.4 mm copper wire. Unavoidably some of the connections have to jump over each other. I did those with isolated wire on the top, to ensure a level surface on the bottom.
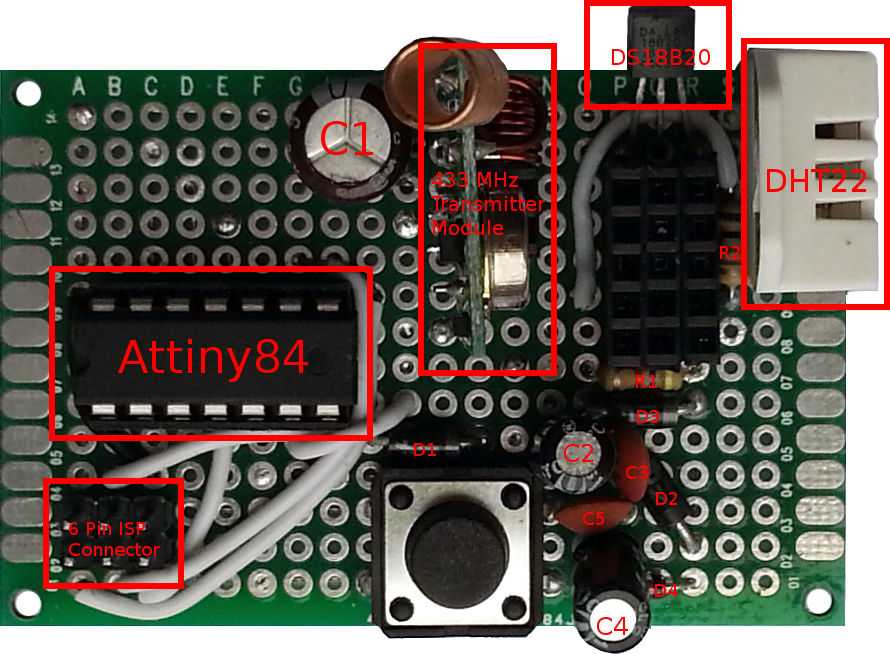
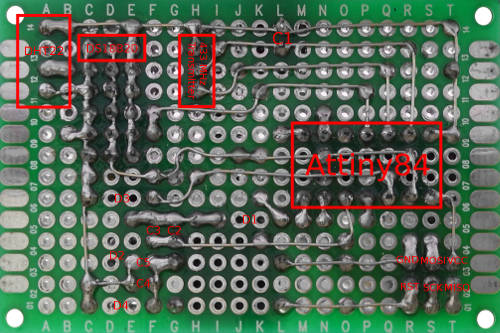
I am not quite sure, if I got the wiring for the 6-pin ISP connector correct, because I don't have an actual 6-pin ISP adapter. Instead I built my own out of some jumper wires and isolation tape. My intention was to have a standards compliant connector, but it's possible that I got it wrong, since I have no way to actually test it.
Unfortunately the ability to program the Attiny directly on the board comes at a cost, because you cannot use any of the ISP pins for other purposes. If there is anything connected to the MISO, MOSI or SCK pins, then the programming will fail unpredictably with unrelated confusing error messages.
Power Source
I built two identical sensor modules, but I used different solar cells and energy storage designs for each setup:
Solar Panels
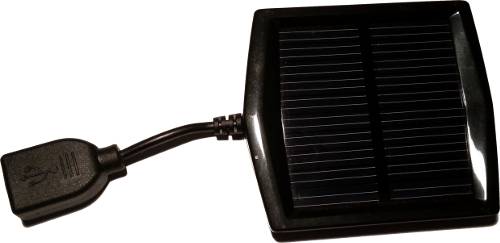
For my first setup I used a solar-panel rated at 5V and 2.5W. With 15x13cm it is quite big. I installed it at a place where there is never any direct sunlight and it still provides enough power for the sensor modules. The setup uses a 66 Farad super capacitor bank as energy storage for the night.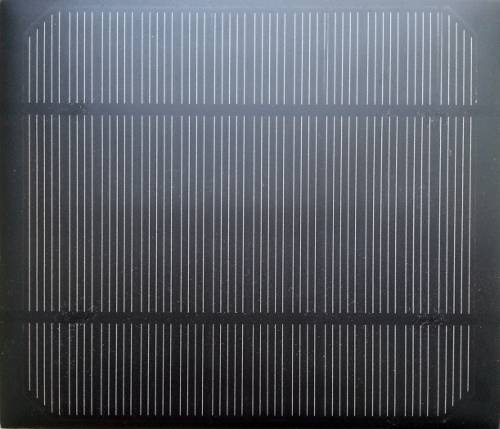 For the second setup I used a tiny cheap 5V USB-solar-panel that came free with something else I had ordered from Amazon. It is of course completely useless for charging something like a smart phone, but it is enough for the Attiny84 and its sensors. During the day the solar-panel charges three NiMH batteries, which power the sensors at night.
Super Capacitors
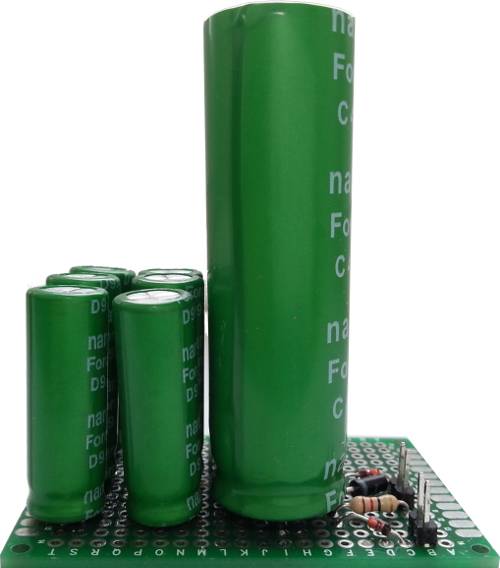
Double-layer capacitors also known as super capacitors have such a high capacitance, that they can be used to power devices for a relatively long time and even replace batteries for certain applications. They are usually much more expensive than rechargeable batteries and are only rated for very low voltages, but they should survive more charge discharge cycles. It's often necessary to connect multiple supercaps in series to support a higher voltage. If capacitors are connected in series, the total supported voltage is the sum of the individual capacitors' rated voltages, but the total capacitance is significantly reduced. The resulting capacitance can be calculated with the following formula:
$$C_T = \frac{1}{\frac{1}{C_1} + \frac{1}{C_2} + ... + \frac{1}{C_n}}$$Here is a small JavaScript calculator for capacitors in series:
I used a 6x4cm perfboard for this simple solar circuit and the super-caps. The solar panel I used, is rated at 5V and 2.5W, but in bright sunlight and without any load I was able to measure 8V. In order to protect my capacitors and my modules I added two zener diodes, D1 and D2 to clamp the input voltage to 5.6 V. The reason I used two is simply, that the first one I soldered in wasn't accurate enough. To prevent the zener diodes from overheating you need a current limiting resistor in series. In my circuit this is R1. The diode D3 is absolutely necessary, because it prevents the capacitors from discharging into the solar panel when it is dark.
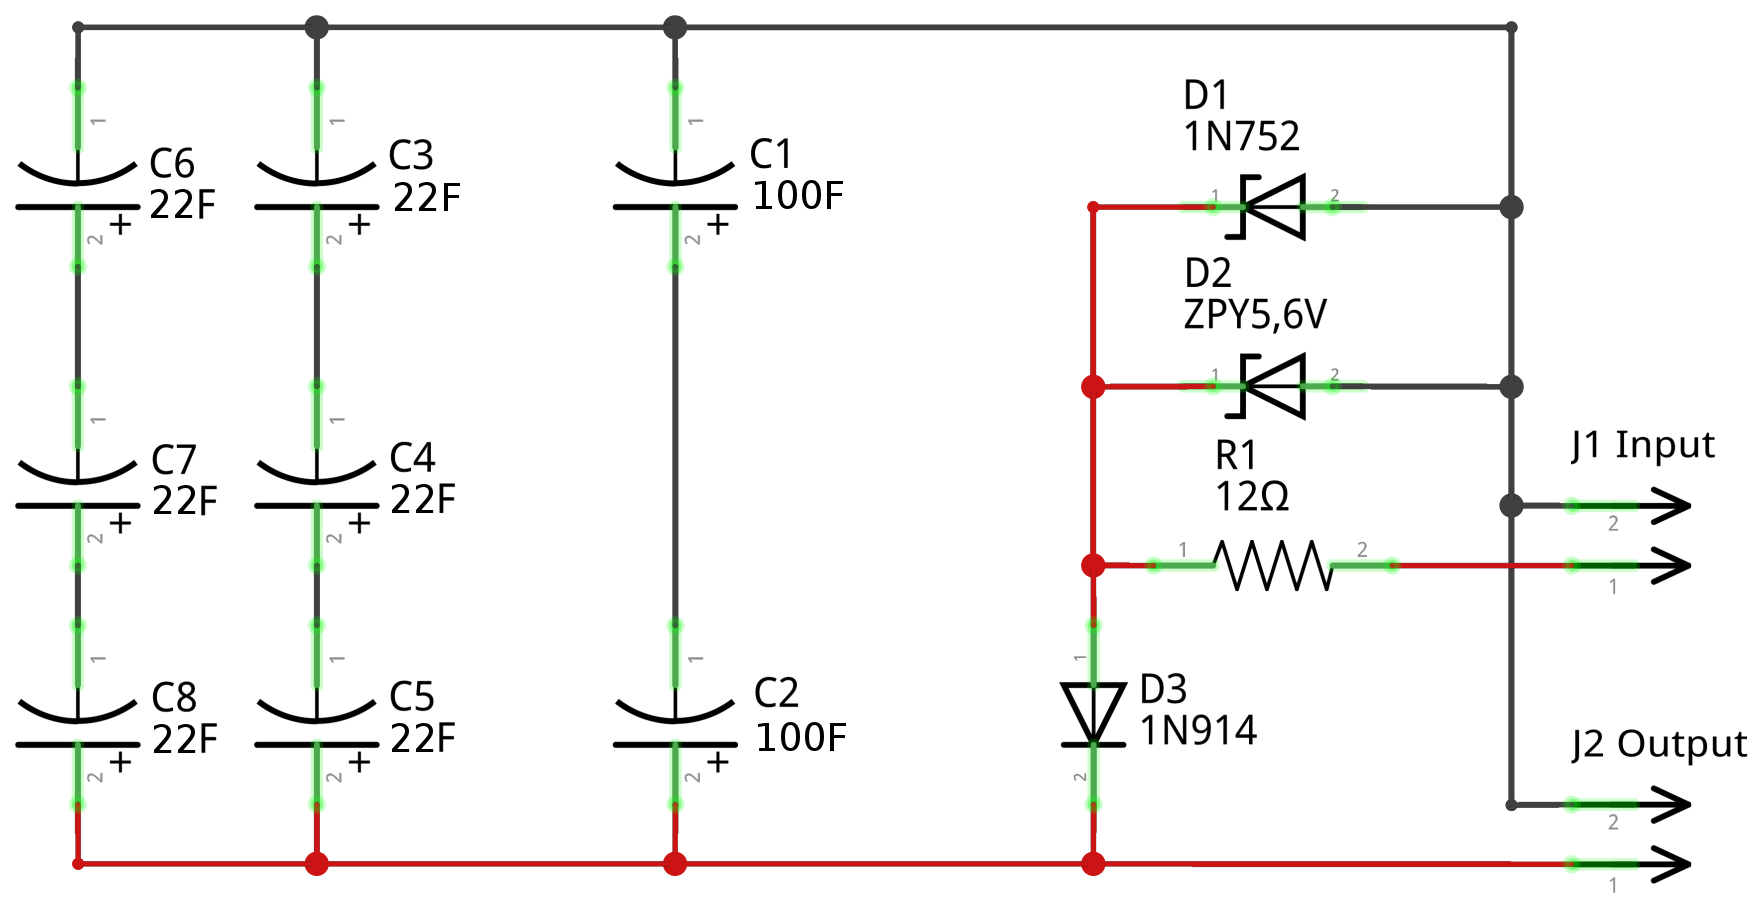
This website explains in great detail how a zener diode works and how to calculate the value of the current limiting resistor needed. I used their formulas to build this little JavaScript calculator:
NiMH batteries
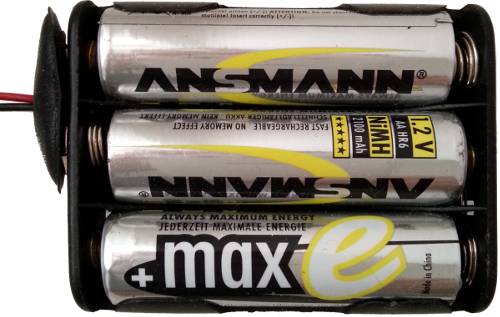
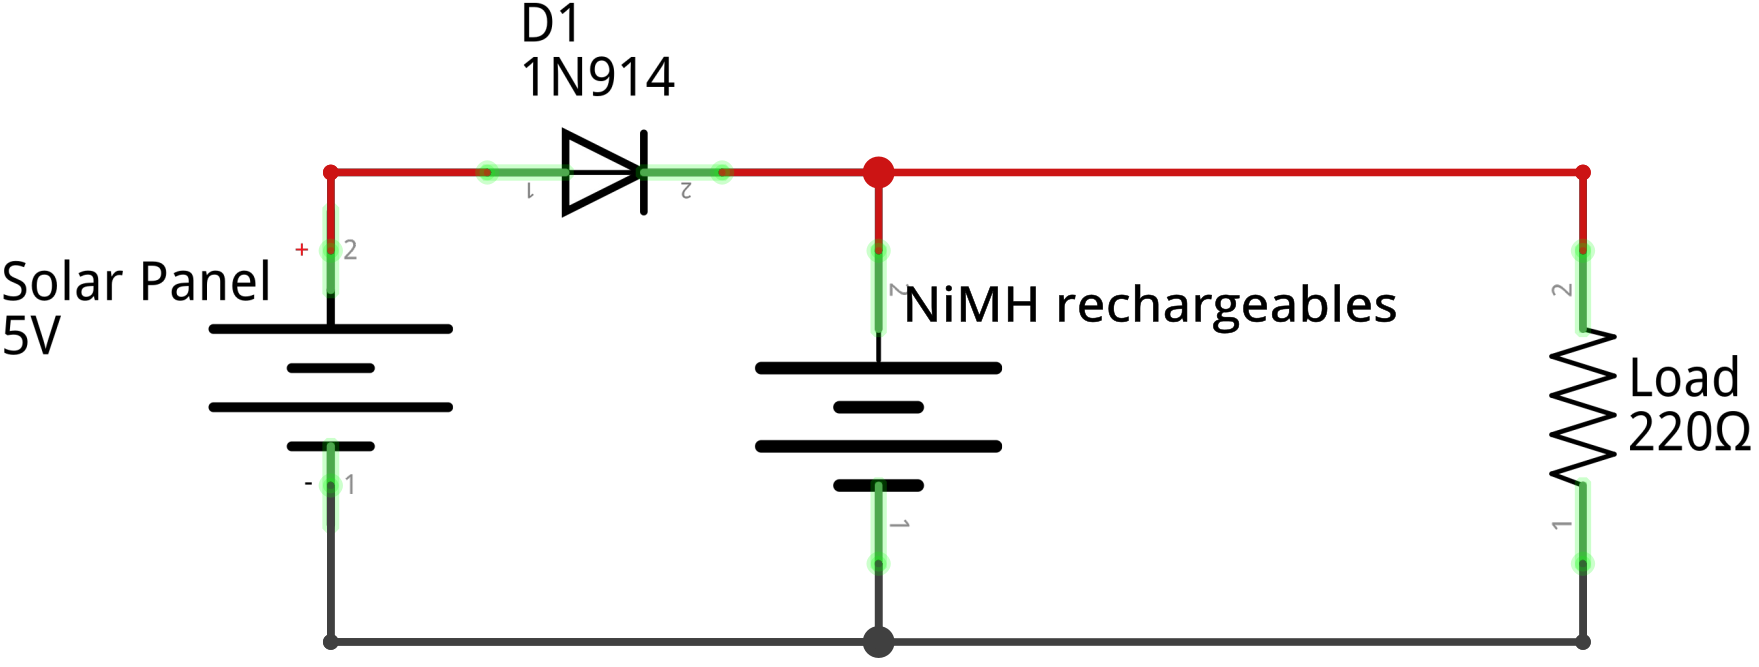
For my second sensor module I used a simpler solar circuit, which consists of just a single diode, and three NiMH rechargeable batteries. The solar module is also much smaller and cheaper and there is no need for any over voltage protection with zener diodes. This setup is much more cost-effective and it actually works better than the super capacitors.
Sample Data
The following graph shows 10 days worth of data collected from my two sensors. I had to reduce the number of samples by averaging 10 minutes of data into one data point, because the JavaScript charting library can't handle that much data efficiently. This also significantly reduces the size of the JSON-files that have to be downloaded:
NiMH batteries VS Super Caps
The two sensors record their input voltage, which is also plotted in the graph above. The sensor measuring the temperature outside is powered by NiMH batteries and the sensor measuring the inside temperature uses super caps. Both are charged by a solar cell during the day. You can see, that the voltage of the batteries is much more stable, while the voltage of the super caps drops linearly during the night.
The super caps are much more expensive and harder to use, but they probably survive more of these charge discharge cycles than the batteries. Since the voltage of the super caps drops linearly, you have to buy a lot of extra capacity to get a usable voltage for the whole night. It is hard to estimate how much capacity is needed for a particular application and you end up wasting a lot of money and time. For this reason alone, I will probably use batteries for my next project.
Source Code
Fritzing Project File
I used the electronics design tool Fritzing to design my board. Here is a download link for the project file.
Voltage Measurement
The Attiny84 can measure its own input voltage with this neat little trick I found on this website. The result is not always accurate and it depends on the internal reference voltage of 1.1V, which can vary slightly from chip to chip.
#define REFERENCE_VOLTAGE     1086030UL

// Code from http://provideyourown.com/2012/secret-arduino-voltmeter-measure-battery-voltage/
unsigned int readVcc() {
  // Read 1.1V reference against AVcc
  // set the reference to Vcc and the measurement to the internal 1.1V reference
  #if defined(__AVR_ATmega32U4__) || defined(__AVR_ATmega1280__) || defined(__AVR_ATmega2560__)
    ADMUX = _BV(REFS0) | _BV(MUX4) | _BV(MUX3) | _BV(MUX2) | _BV(MUX1);
  #elif defined (__AVR_ATtiny24__) || defined(__AVR_ATtiny44__) || defined(__AVR_ATtiny84__)
    ADMUX = _BV(MUX5) | _BV(MUX0);
  #elif defined (__AVR_ATtiny25__) || defined(__AVR_ATtiny45__) || defined(__AVR_ATtiny85__)
    ADMUX = _BV(MUX3) | _BV(MUX2);
  #else
    ADMUX = _BV(REFS0) | _BV(MUX3) | _BV(MUX2) | _BV(MUX1);
  #endif

  delay(2); // Wait for Vref to settle
  ADCSRA |= _BV(ADSC); // Start conversion
  while (bit_is_set(ADCSRA, ADSC)); // measuring

  byte low  = ADCL; // must read ADCL first - it then locks ADCH
  byte high = ADCH; // unlocks both

  unsigned int result = (high << 8) | low;

  result = REFERENCE_VOLTAGE / result;
  return result; // Vcc in millivolts
}
To get better accuracy you can measure the actual input voltage with a multimeter and plug the result into the following equation, which is how I got the value 1086030UL:
Transmitter
You can download the full Arduino project here. The core of the functionality is in the function void sendSensorData() shown below. The main factor governing the behavior of the sensor module is the input voltage measured with the function unsigned int readVcc(). If the voltage is high, then the batteries or super capacitors are fully charged and there is no need to sleep for long periods of time. Conversely if the voltage is low, the module sleeps for several minutes between measurements to conserve power. This way it can adapt to changing circumstances. So if the sun is shining, the module will take more measurements and send more data than at night.
static void sendSensorData() {
  unsigned int unloadedVcc;
  byte chargingCounter = 0;
  byte numberOfDevices, dataSize;
  SensorData *data;

  unloadedVcc = readVcc();

  transmitterOn();
  sensorsOn(unloadedVcc < DOUBLER_THRESHOLD);
  delay(500);

  numberOfDevices = dallas.getDeviceCount();
  dataSize = sizeof(SensorData) + DALLAS_SIZE * numberOfDevices;
  data = (SensorData *) alloca(dataSize);

  for (;;) {
    data->unloadedVcc = unloadedVcc;
    data->vcc = readVcc();

    data->dht.humidity = dht.readHumidity();
    data->dht.temperature = dht.readTemperature();

    data->dallasCount = numberOfDevices;
    dallas.requestTemperatures();

    wdt_reset();

    for(byte i = 0; i < numberOfDevices; ++i) {
      if(dallas.getAddress(data->dallas[i].address, i)) {
        dallas.setResolution(data->dallas[i].address, 12);
        data->dallas[i].temperature =
            dallas.getTempC(data->dallas[i].address);
      } else {
        memset(data->dallas[i].address, 0, sizeof(DeviceAddress));
        data->dallas[i].temperature = NAN;
      }
    }

    wdt_reset();

    sensorsOff();

    transmitter.send((byte *)data, dataSize);

    wdt_disable();

    sleep(8);

    wdt_enable();

    transmitter.resend((byte *)data, dataSize);

    transmitterOff();

    wdt_disable();

    if (data->vcc > 4200 || chargingCounter >= 5)
      sleep(16);
    else if (data->vcc > 3000)
      sleep(150);
    else if (data->vcc > 2000)
      sleep(300);
    else {
      do {
        sleep(600);
      } while (readVcc() <= 2000);
    }

    wdt_enable();

    unloadedVcc = readVcc();
    // If the supply voltage is increasing, then
    // batteries or capacitors are charging
    if (unloadedVcc > data->unloadedVcc)
      if (chargingCounter < 10)
        ++chargingCounter;
    else
      chargingCounter = 0;

    sensorsOn(unloadedVcc < DOUBLER_THRESHOLD);
    transmitterOn();

    delay(250);

    transmitter.resend((byte *)data, dataSize);
    wdt_reset();
  }
}
Receiver
You can download the full Arduino project here. I use an Arduino Pro Mini on a breadboard as a receiver. It is connected to my home server via USB and constantly listens for incomming packets. Once a packet arrives it logs the received data as text to the serial output. My server logs the serial data to a big log-file, which is later parsed to store the data in a database. Most of the complexity of the receiver is hidden in the RFReceiver library, which I have covered in more detail in this post.
The following Bash script filters and logs the serial data to the file ~/arduino_received.txt. The buffering of STDOUT and STDIN has to be disabled, because it would take a very long time for the small amount of incomming text to fill the kilobyte-sized buffers of the pipeline. So the data in the log-file would lag behind several hours and a server reboot would result in hours of missing data.
#!/bin/sh

# Set terminal speed
stty -F /dev/ttyUSB0 ispeed 9600

cat /dev/ttyUSB0 | stdbuf -i0 -o0 -e0 tr '\r' '\n' |
    grep --line-buffered Data |
	awk '{ print systime(), $0; fflush() }' >> ~/arduino_received.txt
References
- Attiny84 Datasheet - http://www.atmel.com/Images/doc8006.pdf
- DHT22 Datasheet - https://www.sparkfun.com/datasheets/Sensors/Temperature/DHT22.pdf
- DS18B20 Datasheet - http://datasheets.maximintegrated.com/en/ds/DS18B20.pdf
- RFTransmitter library - https://github.com/zeitgeist87/RFTransmitter
- EEVBlog #473 - Microcontroller Voltage Doubler - https://www.youtube.com/watch?v=I4ED_8cuVTU
- Double-layer capacitor Wikipedia - https://en.wikipedia.org/wiki/Electric_double-layer_capacitor
- Fritzing Electronics Tool - http://fritzing.org/